Monday, February 26, 2018

Nuts about Marzipan

People ask "How do you stay so thin working with chocolate?"  Well, other than going to the pool and swimming laps most weekdays, I try to refrain from sampling what I make.  Actually it's easier than it sounds after a while.  That's not the case for me with marzipan.


Antique metal marzipan mold for walnuts


I'm nuts about marzipan.  Not the sickly sweet creamy smooth paste that can enrobe cakes or what you buy at the grocery.  No, I'm talking about homemade marzipan that I grind up myself, often to the consternation of the food processor that frequently smokes and shuts off.  I have to wait for it to cool down and then start grinding over again.  Someday I'll get a professional processor or in my dreams a melanger, but that day is not here yet.  Unless people start appreciating marzipan in this country and I start selling lots of it and have to make many batches.  I'm hoping!

The final walnut from mold above, once painted.

I like to make my own because I like it not to be too sweet.  It also has a little texture.  A processor will never get it perfectly smooth (that's where the melanger comes in).  But I'm OK with that.  And you should be too.  Why settle for mass produced commercial marzipan when you can have something better?  OK, I'll get off the soapbox now.

I lucked into some antique marzipan molds in Belgium, and am having a great time putting them to use.  I got about 40 of them, so you'll see them pop up from time to time.  Quite a few are Easter themed (a future post), a bunch are pigs (a future post and some shown in the 1/1/18 post).  But beyond the traditional fruits there are some that are rather eclectic (crayfish, feathers) and quite a few animals.  I molded up some animals this past weekend when I made the Easter selections.  So I thought I'd share them.


This little bear is just about 2 inches high.  Not so easy to mold, his little feet didn't want to release from the mold.  So I just made one.  All that fur, and the detailed pads on his paws are part of the mold, not just painted on.    I've named him Gary, in honor of my friend who has "Bear" as his nickname.


Here is another small mold, this time an owl.  Her name is Yvette.  She has a very nice backside, too. 


While she is modest, Yvette did agree to turn around so you can see the detail of her wings and feathers, again part of the mold, not just painted on.

Most folks that buy these little marzipan figures don't eat them.  They put them on the shelf!  While they do last a good long time, and I am happy to think of them as art, I certainly don't have the discipline to resist biting off their heads and munching down.  I can always make more...

I hope you give marzipan a try!


Monday, February 19, 2018

Handpainted Transfer Sheets


Port Ganache Praline with hand painted transfer sheet design


For those of you not familiar with the term "transfer sheet", it's nothing more than a piece of acetate that has pigmented cocoa butter covering one side of it.  I say "nothing more" but the transfer sheets one can buy vary in quality and colors and there are a multitude of designs for almost any idea, holiday or whim.  Check out Chef Rubber and Chocotransfersheets for two sources of beautiful sheets.  Basically, they make their sheets with a specialized silk screen process that uses pigmented cocoa butter as the "ink".

Custom Painted Transfer Sheet designed for Valentines Day


Some times I want a specific design that I can't get from either place, and I only want one or two sheets.  Since I'm a long way from being a big production house pumping out zillions of chocolates, I make my own.  I find painting a transfer sheet can be very meditative.  I guess we all have our thing.  Some days painting transfer sheets is mine.

These lemon-mint pralines used the transfer sheet shown in the  next two photos below.


Anyway.  Just how does a transfer sheet work, you ask?  Well, you place the acetate sheet paint side down on liquid chocolate.  And the heat of the liquid chocolate acts like a sort of solvent that melts the cocoa butter.  As the chocolate and the cocoa butter cool, they become one (see, that zen thing going on here?).  Once the chocolate has set, the acetate sheet is peeled off of the chocolate, and the cocoa butter design that was once on the acetate has now magically transferred to the chocolate.

Mold seen from Back with transfer sheet and magnets


There are some special mold that have a removable bottom into which one places the transfer sheet, and then places the bottom back into the mold.

Mold seen from Front with Cavities

The mold and the bottom have magnets that hold them fast together, and keep the transfer sheet in place.  If the sheet moved, then the transfer would get all muddy looking and of course you would have to feed all those chocolates to your partner and kids...

Filled Mold (can't see transfer sheet)


That's only one way to use transfer sheets.  You can also just cut pieces of the sheet and place it on top of liquid chocolate, and make sure it doesn't move.  That's the process used here.  I made some wasabi-lime truffles, and made up a transfer sheet in greens.  I wanted to give the impression of sushi.


It's also a great way for people to decorate their own chocolates.  My friend Judi, a beautiful fine arts painter, came over the other day and we played around in the studio.  She painted up her own transfer sheet, then we made up a box of chocolates with them for her to take home.  Edible art!


Monday, February 12, 2018

Playing with Tape


Instagram is great.  So much inspiration and great energy from people we might never get to know otherwise.  I discovered Hiba Chocolates  and in this post she really got me thinking about what I wanted to accomplish with my chocolates this year.  I've decided it was the year to experiment and perfect my craft.  So with a big thanks to Hiba, I've started working away at it.  My friends are thankful to her as well, they get to eat all the rejects as I experiment.

I started with something simple, playing with tape.  I used both vinyl and paper, and have had much cleaner edges with vinyl tape.  Some of the tape is very thin, about 1mm.  Here's the output from playing with tape a bit.


Tape down the middle, and a toothpick to scrape away the paint for X&O


Criss Cross Tape, two different widths, and three dots using different width "dotters".


Criss-Cross tape, same width.

Thank you Hiba!


Monday, February 5, 2018

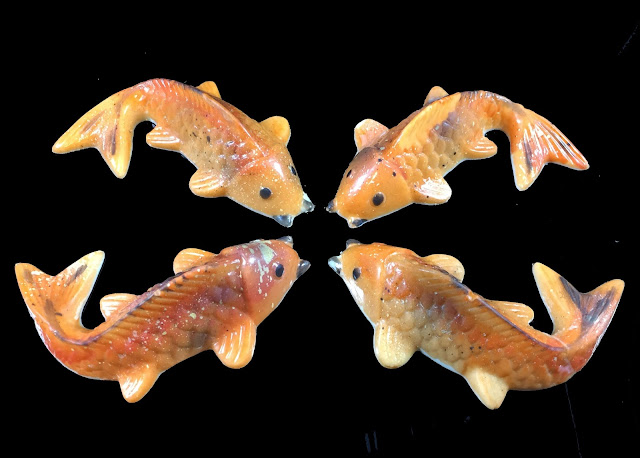
Challenging Koi

I am a sucker for pretty molds, even though they are often way beyond my ability to use them properly.  Ignorance is bliss, I suppose.  I got the koi mold, and promptly set about to mold them.  And curse them.  And mold them.  And curse them.  And mold them.  And curse them.  You get the idea.

Besides having a ton of detail, the molds also have some very shallow spots and some very narrow deep spots.  This makes getting chocolate in them and paint in them very hard.  The paint stuck, the air bubbles got trapped no matter what, and the fins, whiskers and tails broke off.

I suppose that I could have gone the easier route and just made solid chocolate shapes that were not filled.  But what's the fun in that?  I put the mold away but didn't stop thinking about it.  I now saw this mold as a learning challenge.  If I could master this mold, the fussiest one in my collection (not extensive by any means, but I'm not suffering for lack of molds, either) then I figured that I'd be on my way to being a better chocolate maker.

This mold requires carefully painting with the finest brush, using toothpick and paintbrush, splattering well, and thinning down the chocolate with cocoa butter quite a bit for the shelling.  And very carefully unmold, using a backing sheet (piece of cardboard or the like) so that the pieces gently fall out of the mold, no smacking like we see in those fancy YouTube videos.  Otherwise the whiskers, fins and tail break.

So while I'm not quite there yet, I think I'm getting close.  White chocolate with orange butter ganache koi.


Making your own colored cocoa butter

Painting chocolate molds allows another dimension in creating chocolate confections, and beautiful colour combinations are fun for both the ...

Copyright Sin Confections. Powered by Chocolate.